Thanks to GHOST mode (available starting with EAGLE Manager X v2), the EAGLE is able to control PLL devices (SESTO SENSO 2, ESATTO, ARCO, GIOTTO and ALTO) by using its WiFi connection instead of a standard USB cable, without forcing you to use special drivers or software. When you activate GHOST mode, EAGLE Manager X wirelessly connects to your PLL devices and creates a new COM device, as you would have with a standard USB cable (that now you can remove) so you can keep using your astrophotography programs and ASCOM platform as you always have.
NOTE – in order to use GHOST mode, you are required to:
- Connect all your PLL Devices to your EAGLE with USB cables (you will remove USB cables later). WiFi of your PLL devices has to be turned on.
- Set your EAGLE Wifi card at 2.4GHz and check that your WiFi card drivers are updated. In order to do this, follow this procedure:
- Go to Windows “Control Panel” and then select “Device Manager”
Expand the “Network adapters” item. - Right click on the WiFi card driver (“Intel(R) WiFi 6 AX210 160MHz” or “Intel(R) WiFi 6 AX201 160MHz” or “Intel(R) Wireless-AC 9462″ or “Intel(R) Dual Band Wireless-AC 7265” based on the EAGLE version you have) and select “Properties”
- Select the “Advanced” Tab.
- Set “802.11a/b/g Wireless Mode” to “2.4GHz 802.11b/g”
- Set “802.11n/ac/ax Wireless Mode” to “Disabled”
- Set the “Preferred Band” to “Prefer 2.4GHz band
- If you have the “Intel(R) WiFi 6 AX210 160MHz” WiFi card, please also set “Ultra High Band (6GHz)” to Disabled
- Select the “Driver” Tab.
- Check the driver version to be greater or equal to
23.30.0 if you have the “Intel(R) WiFi 6 AX201 160MHz”, “Intel(R) WiFi 6 AX210 160MHz” or “Intel(R) Wireless-AC 9462”
19.51.21.1 if you have the “Intel(R) Dual Band Wireless-AC 7265” - If not, download and install the updated driver from the following links:
for AX210/201/200 and AC 9462 network cards click here
for AC 7265 network cards click here
- Go to Windows “Control Panel” and then select “Device Manager”
- Press OK.
- Reboot Windows.

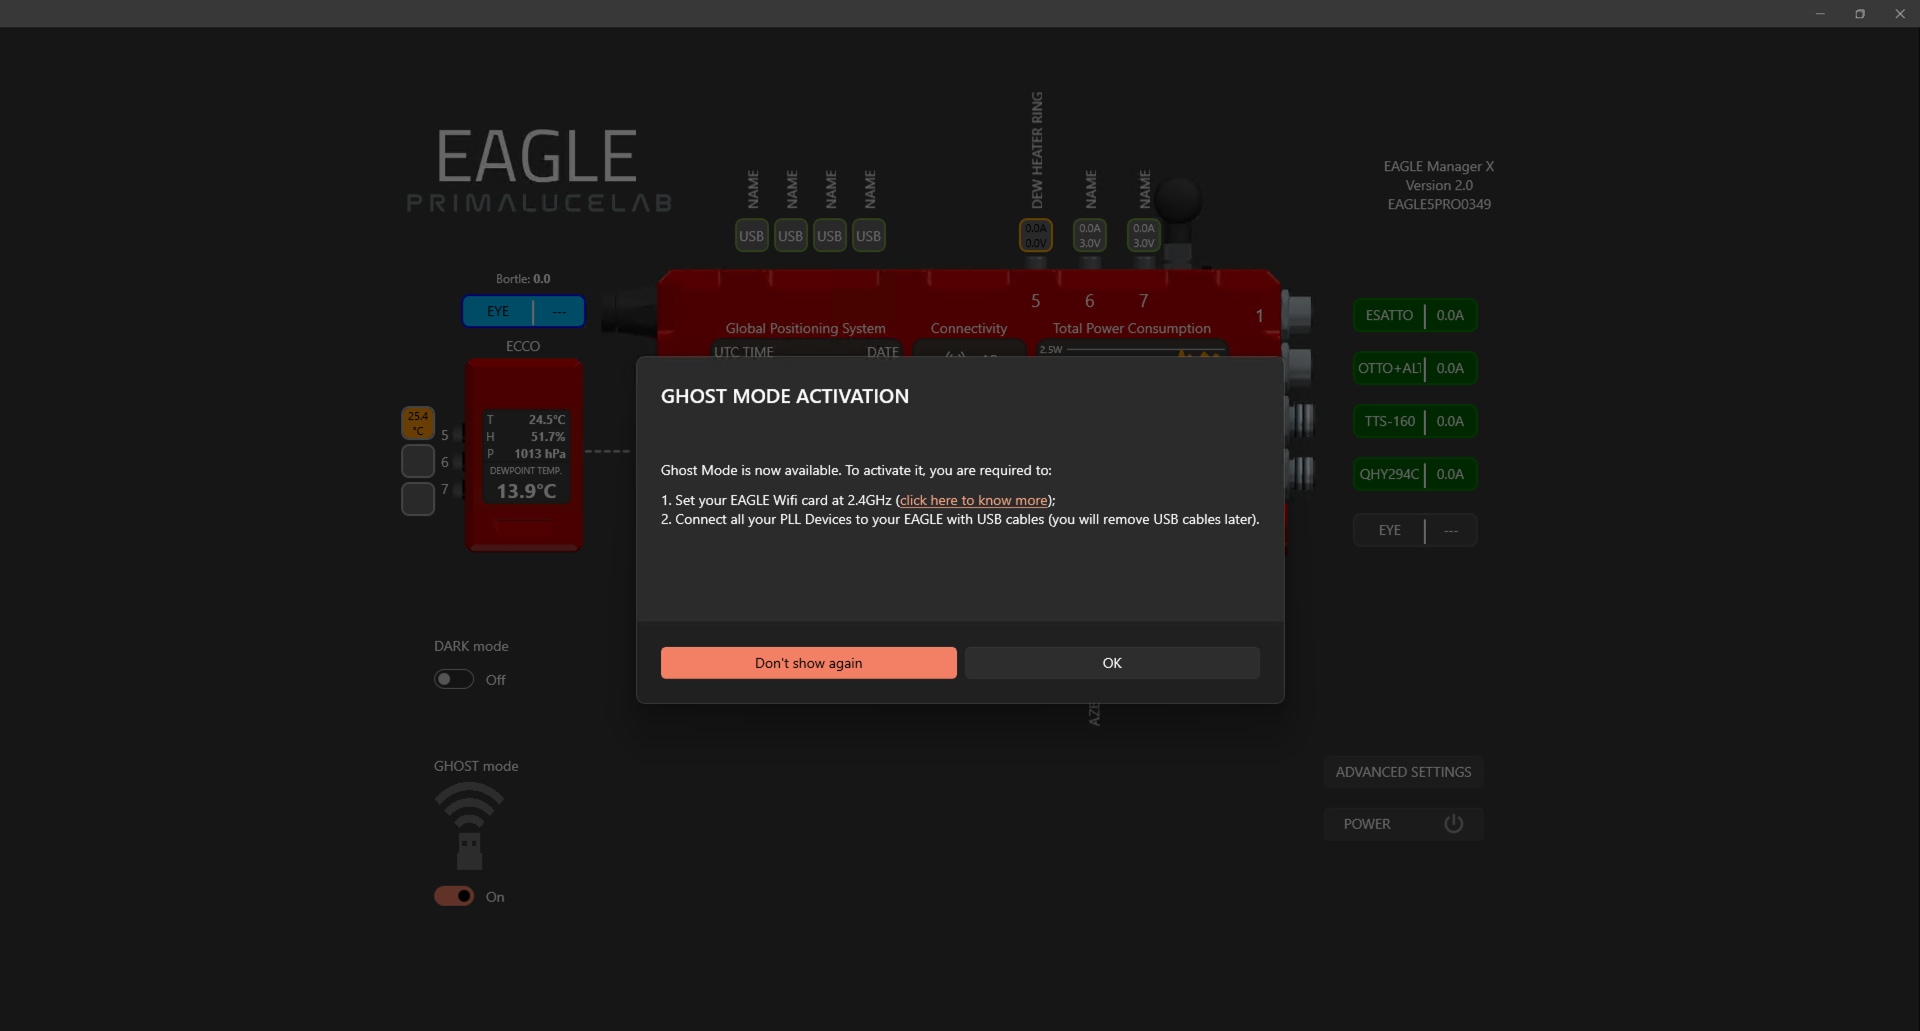
Now click on the activation button below GHOST mode icon and you will see a new window that will remind you to check your wifi card settings and driver version. Don’t disconnect your devices USB cables now, you will disconnect them later. Click on OK button to proceed.
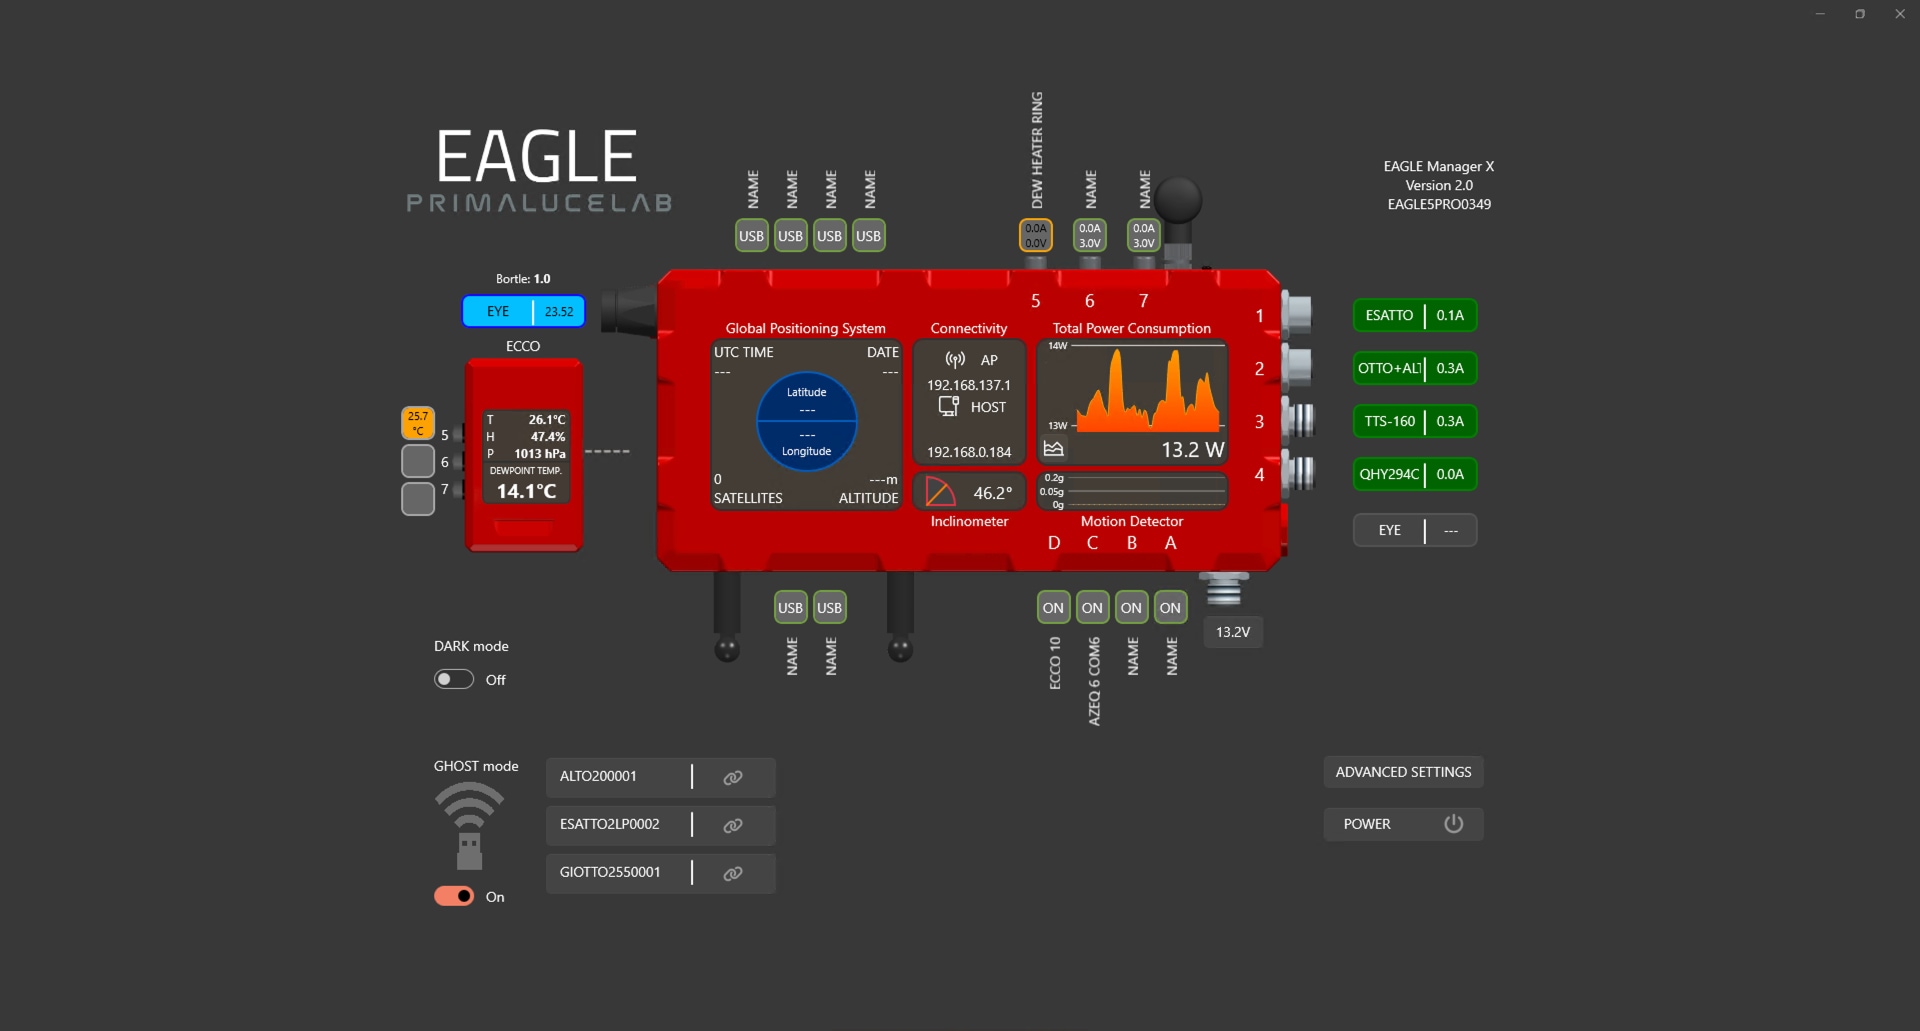
If you have one or mode PLL devices (SESTO SENSO 2, ESATTO, ALTO, GIOTTO) connected to the EAGLE with USB cable, you will find new buttons to the right of the GHOST mode icon.
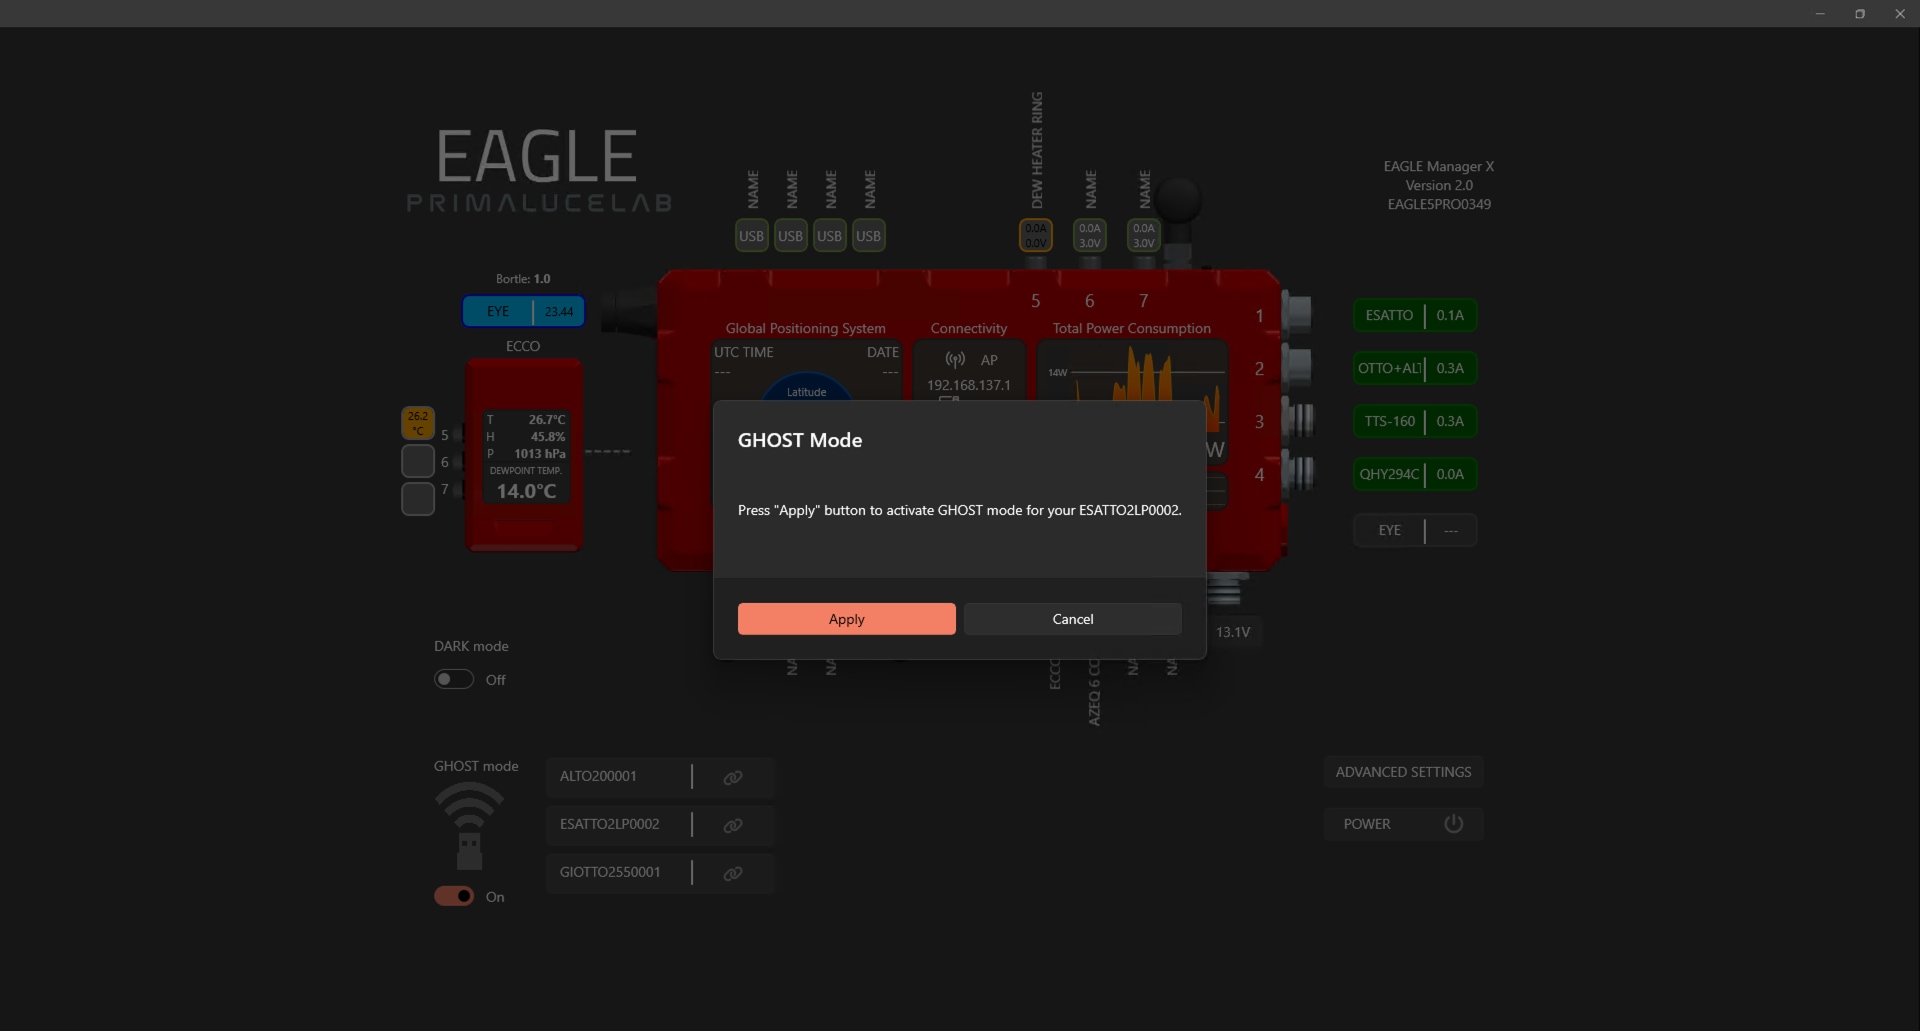
Make a mouse left-click on any of them to view the confirmation window, you can now press the “Apply” button to activate GHOST mode for the selected device.
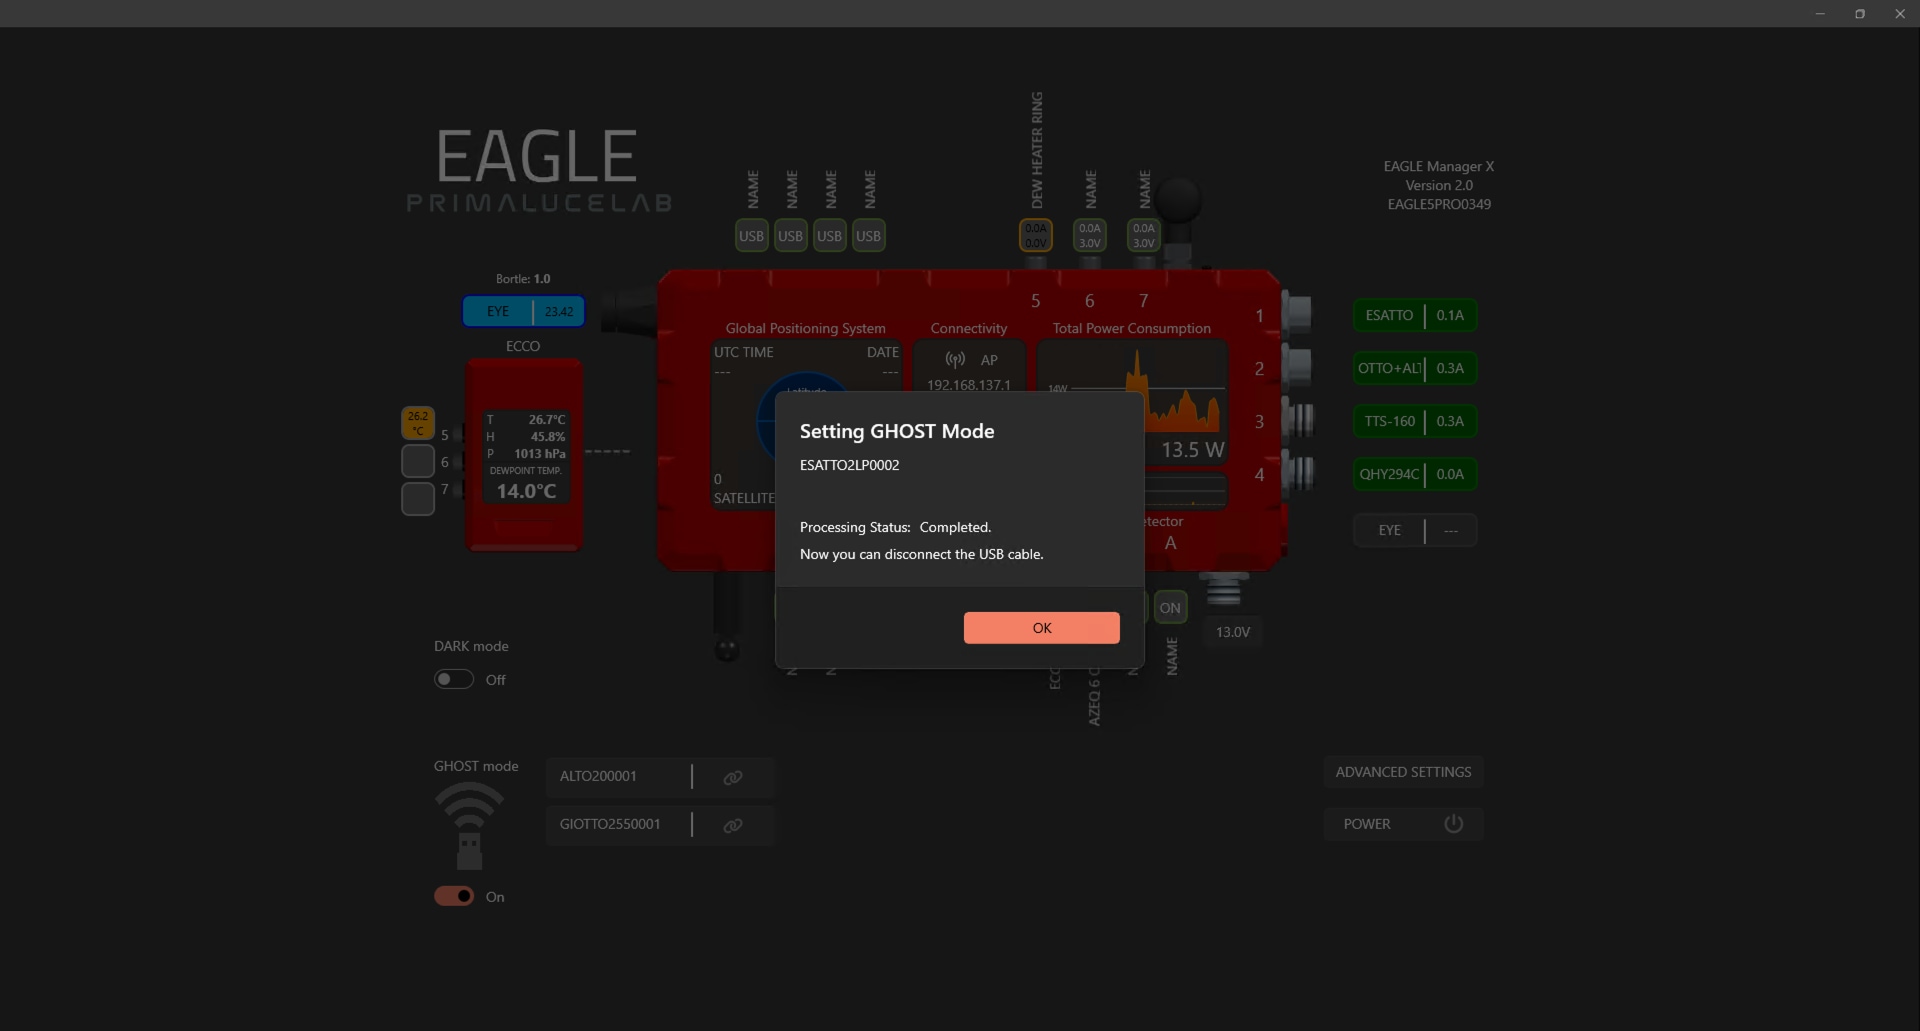
As soon as the GHOST mode is activated, you will see the confirmation. You can now disconnect the USB cable and press OK button to proceed.
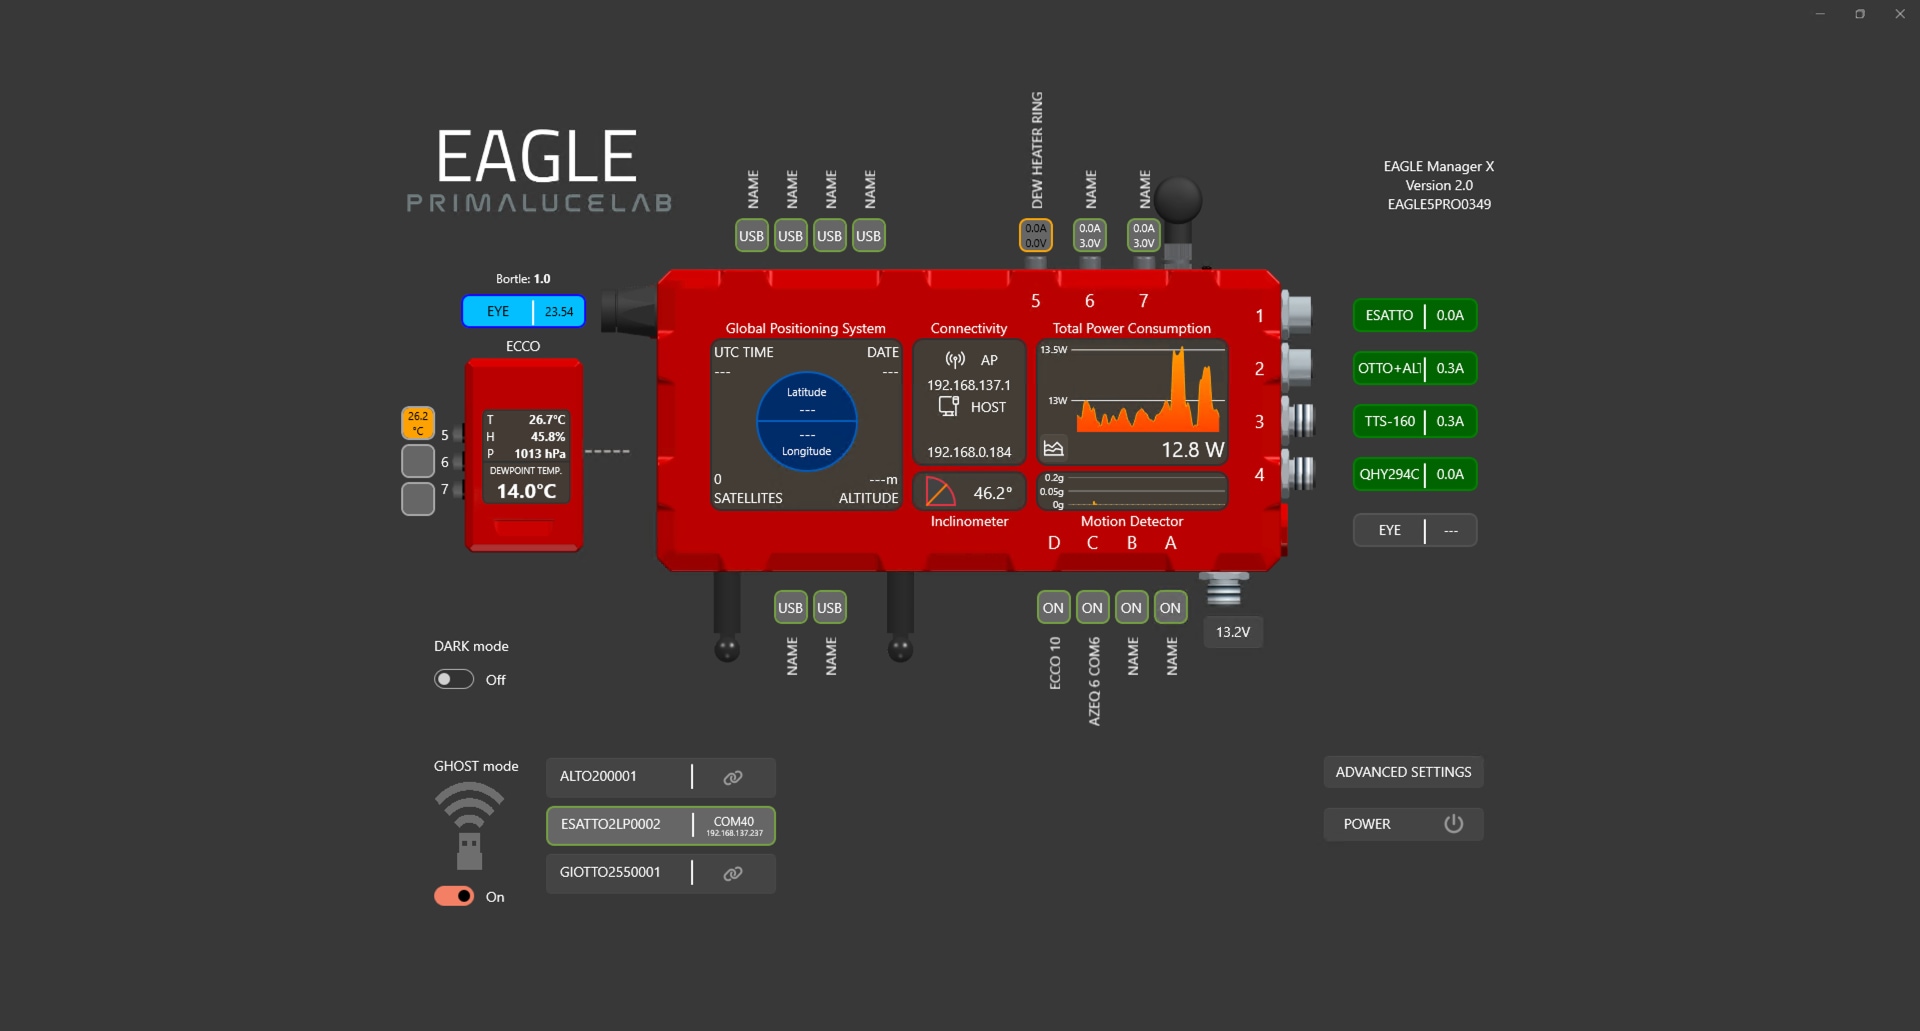
Your device is now connected to the EAGLE by using the WiFi connection instead of the USB cable. In fact you will see the button with a green border that confirms that the device is connected. In the button you can find the number of COM port that EAGLE Manager X associates to the wireless connection: when you want to connect and control your device with a control software (like PLAY or another software through ASCOM platform), you will have to use this COM port number instead of the COM port previously created by Windows when you used the USB cable (this COM port number is no more available now). Below the COM port number, you can also find the IP number associated to this device, this will be used in order to let you control the device with the Virtual Handpad, please refer to the next paragraph to know more.
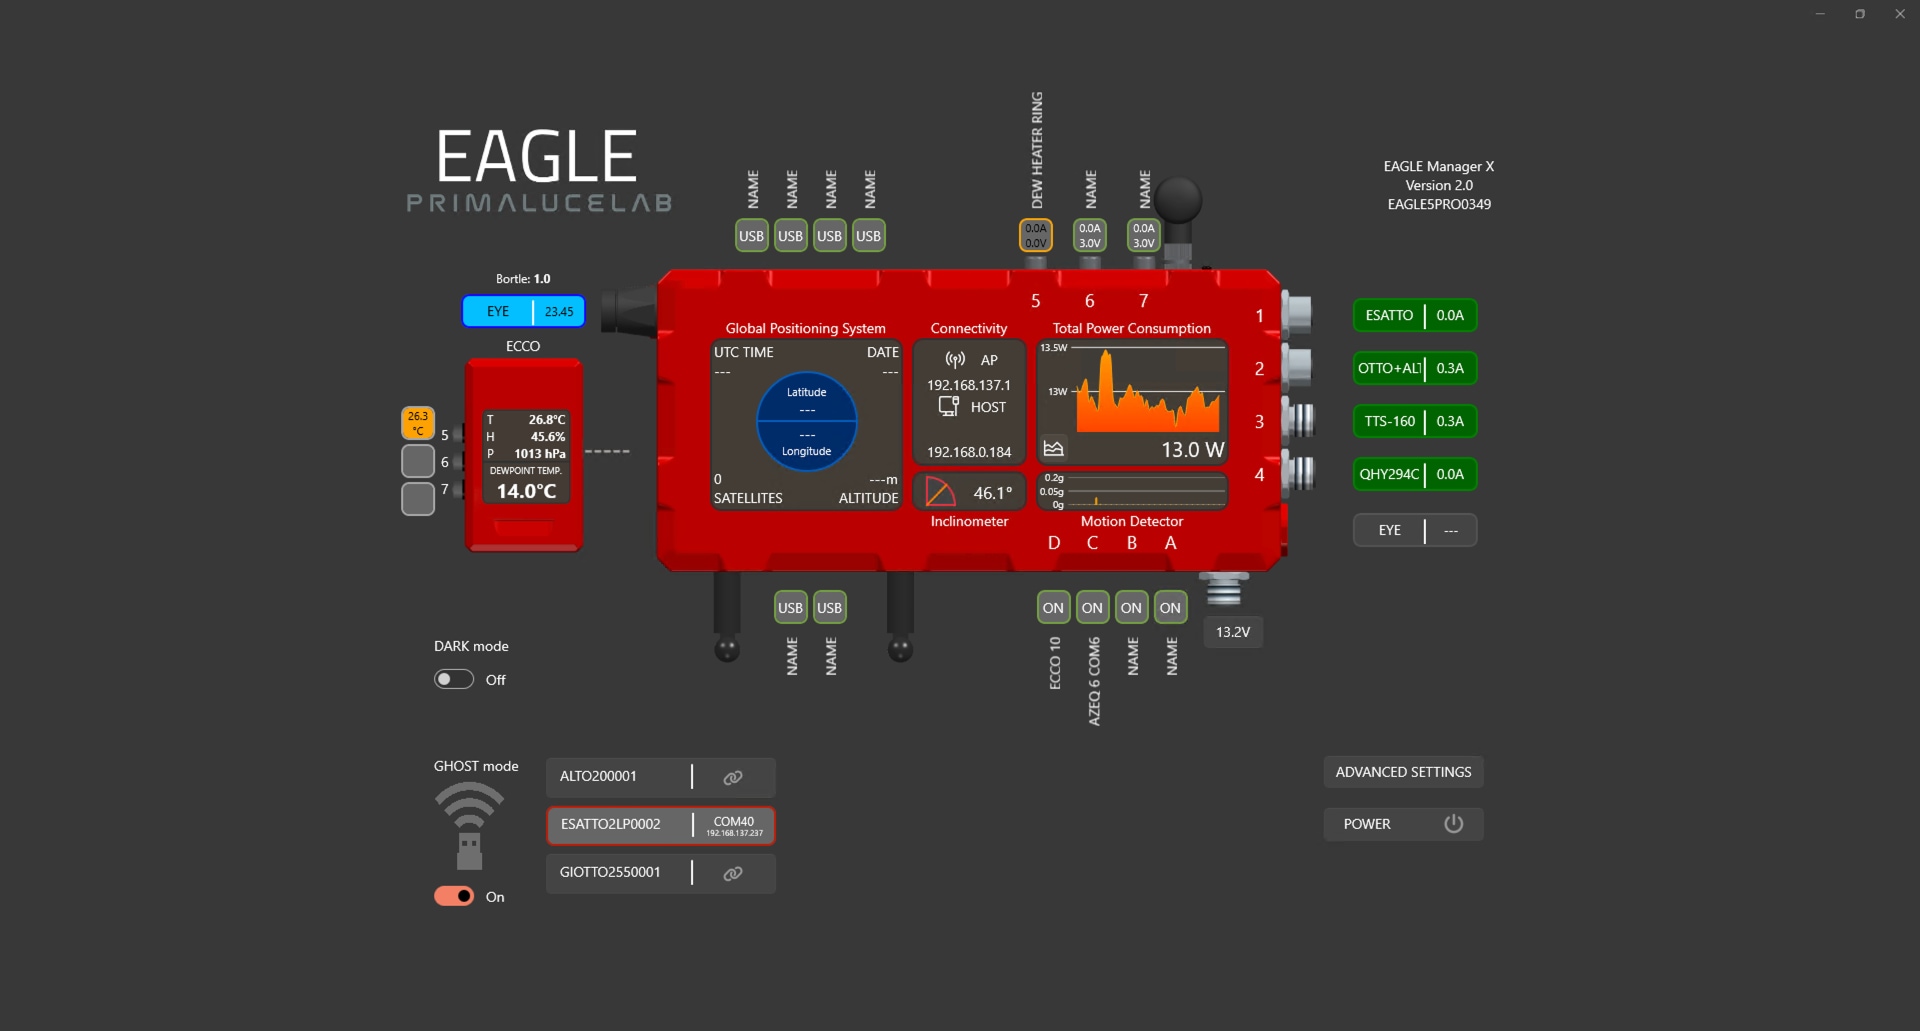
If you want to disconnect your GHOST mode activated device (in the same way you can do with the A, B, C and D USB ports of the EAGLE) you can make a mouse left-click and the button border will become red.
If you want to completely deactivate GHOST mode from the device and come back to the standard USB connection (this also restore the device WiFi connectivity to let you directly connect with the Virtual HandPad) you can make a mouse right-click to view the confirmation window.
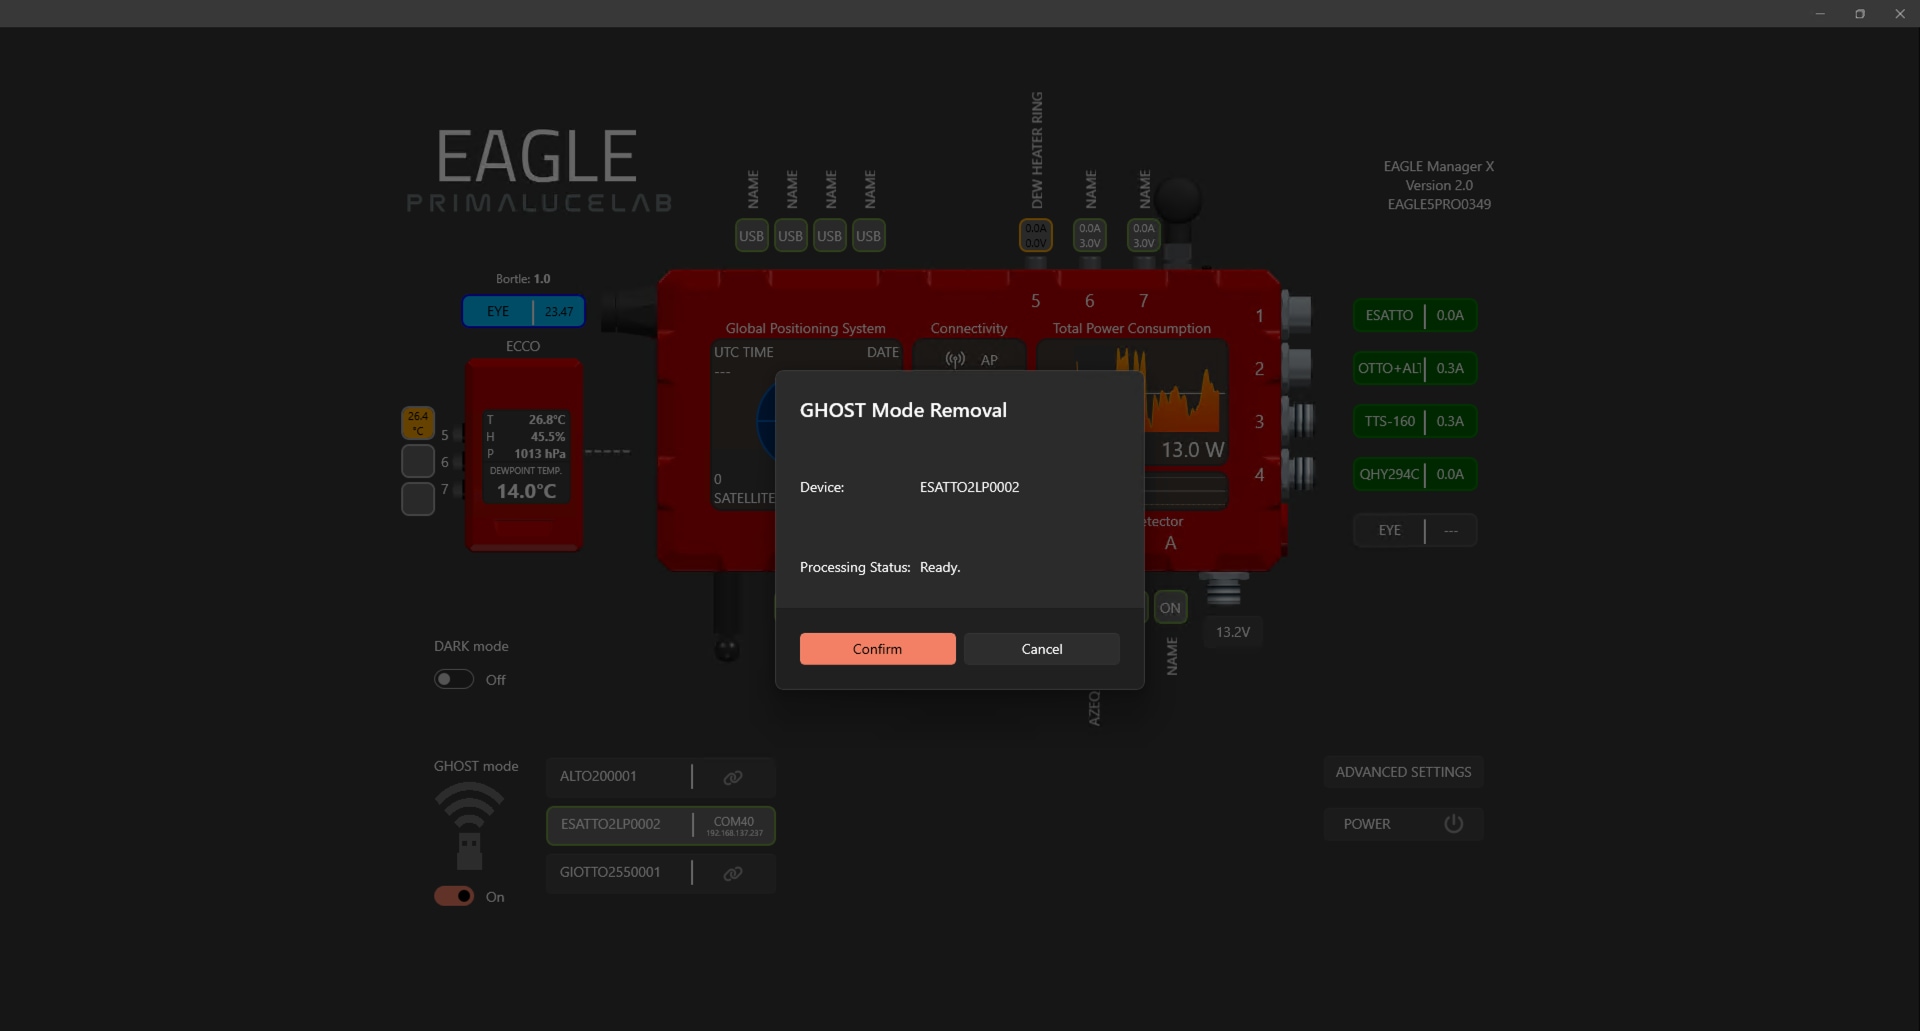
Click on “Proceed” button to confirm removal of GHOST mode, this way you can connect again the USB cable to the device and come back to the standard connectivity status.
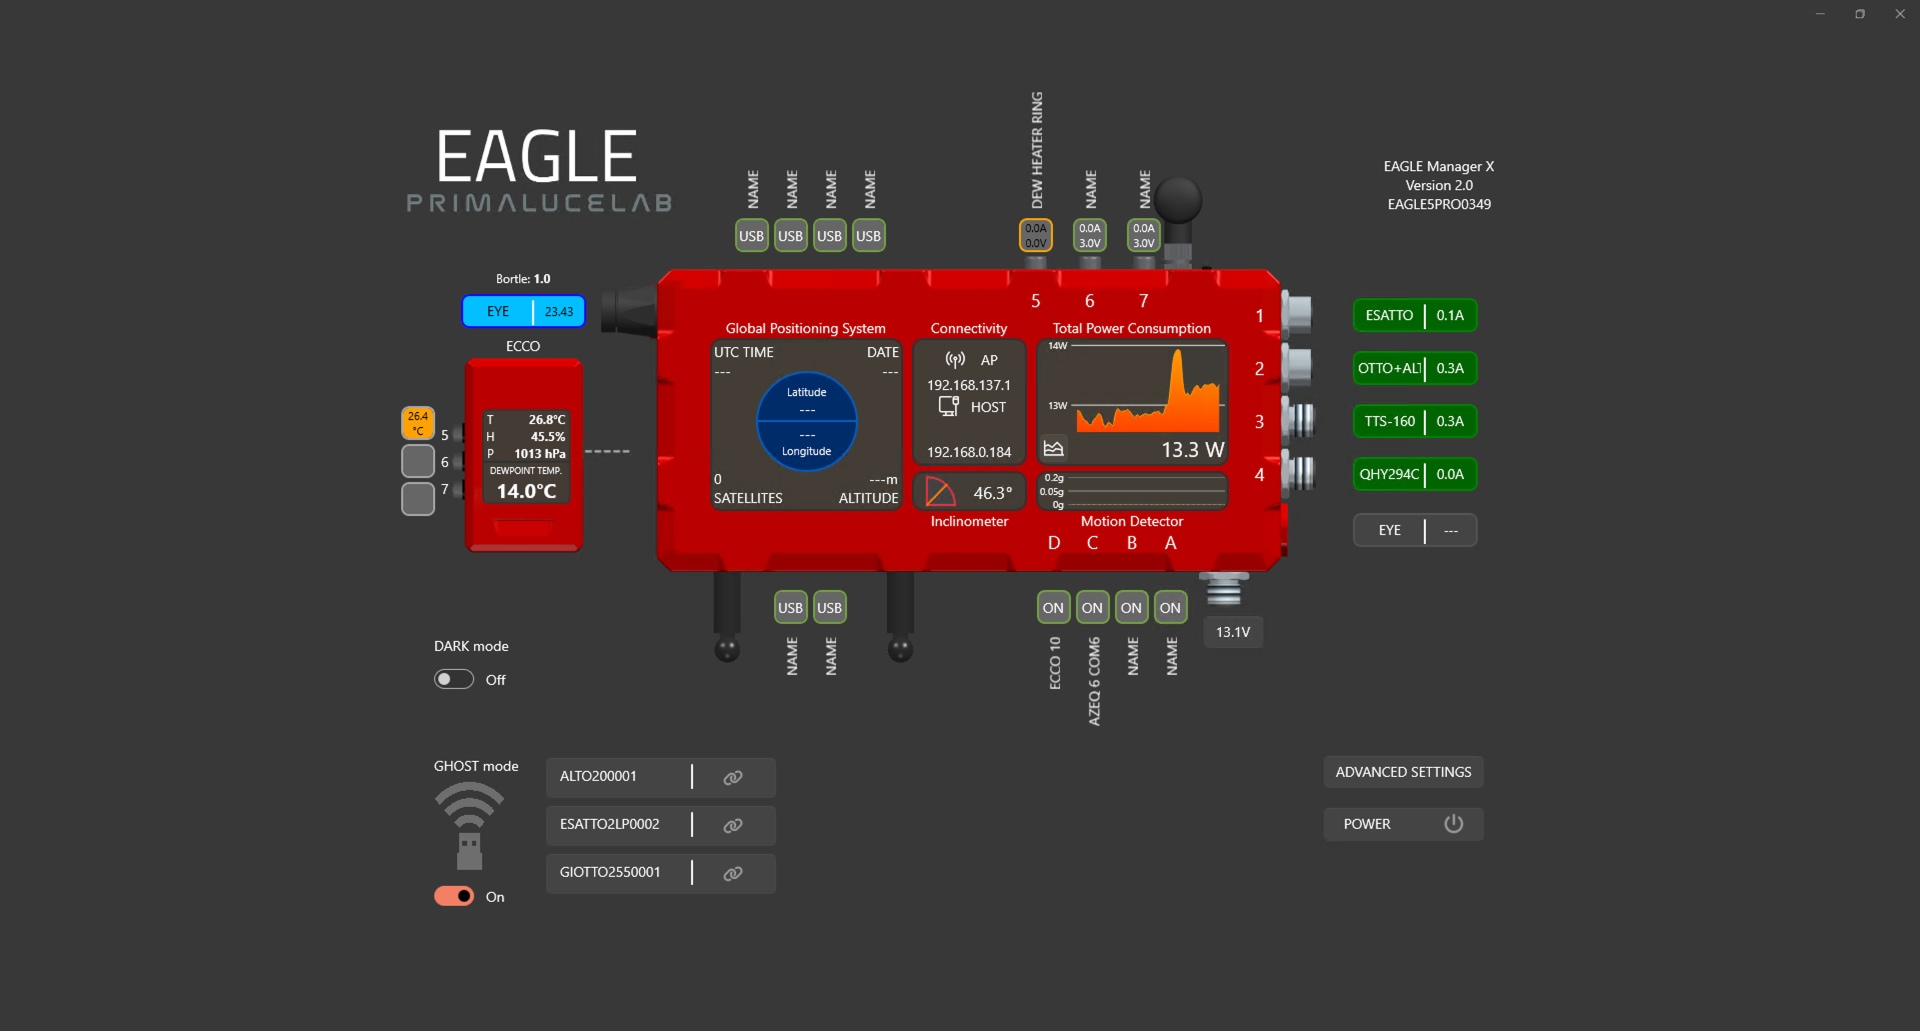
Notes to the use of GHOST mode:
- GHOST mode has been tested in all the EAGLE computers with Windows OS at least Windows 10 1809.
- When you activate GHOST mode, the standard WiFi connection of selected device is no more accessible, and this means that you can’t access the Virtual HandPad by connecting to its WiFi network as you do by default. In order to use the Virtual HandPad, you have to:
- Connect your smartphone or tablet to the EAGLE WiFi connection
- Open browser and type the IP number associated to the device, as shown in the related button (with green border) under the COM port number.
- This will allow you to see the Virtual HandPad
- If you have more PLL devices connected to the EAGLE with GHOST mode and you want to control all of them also with the Virtual HandPad, you can keep your smartphone or tablet connected to the EAGLE’s WiFi network and just change the IP number as shown in the EAGLE Manager X interface.
- Especially for the first connection setup, you might notice a certain delay in the appearance of the GHOST mode buttons. This is normal and due to the authentication time of the device connected to the EAGLE wireless network.
- When you replace the standard USB connection with the GHOST mode wireless connectivity, please remember also to change the COM port number registered in the software you use to control PLL device through the PLL ASCOM drivers or in PLAY. This is very important since, by removing the USB cable, also the “old” COM port number that Windows associates to your PLL device is not available anymore.
- When you shutdown or reboot your EAGLE, you don’t need to activate GHOST mode again since, at EAGLE Manager X launch after Windows startup, it will automatically activate again with the same settings.
- If, following a Windows update, some of the devices connected in GHOST mode do not appear in the list of the connected devices, restart the EAGLE Manager X by turning off the ports that power the PLL GHOST mode connected devices.
- GHOST mode works only if you set the EAGLE’s WiFi network at 2.4 GHz since, even if EAGLE WiFi network can be dual channel (2.4 and 5 GHz), WiFi controller in all the devices (SESTO SENSO, ESATTO, GIOTTO and ALTO) is 2.4 GHz only. This means that, even if a lower frequency may provide a longer range, by setting the EAGLE’s WiFi at 2.4 GHz you may experience a slower refresh rate in Remote Desktop and this is normal. You may also experience some RFIs (radio frequency interferences) since they’re usually more probable at lower frequencies. If you experience lower WiFi performances after you activate GHOST mode, you may consider coming back to standard USB cable and reset your EAGLE’s WiFi to 5 GHz.
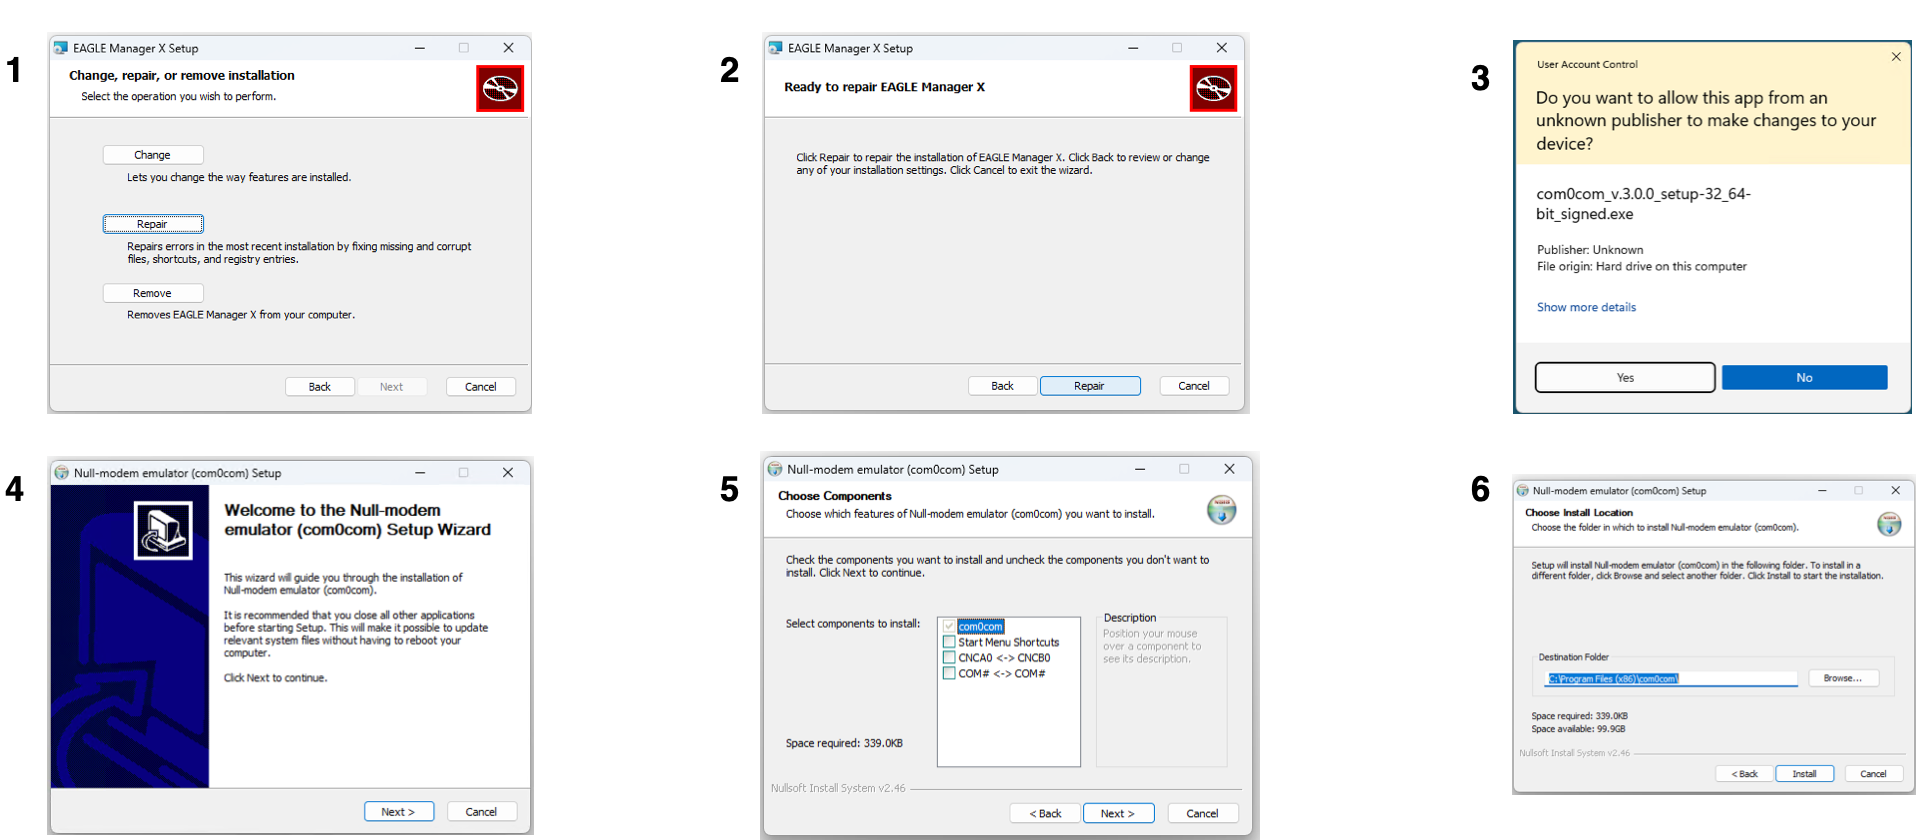
- If, after configuring GHOST mode, the device does not appear in the list of available devices, please follow this procedure:
- Double click on the EAGLE Manager X installer then click on the “Next” button
- Click on the “Repair” button;
- Click “Repair”
- In the “Do you want to allow this app to make changes” window, choose “YES”
- Press “Next”, then “Agree”.
- Whether you install the add-ons or not is irrelevant for the GHOST mode setup. Press “Next”
- Keep the default installation path and press “Install”
- Then press “Next” and wait until installation is completed.
- Press “Finish” and reboot Windows.
